Friday, May 27, 2016

Is your subject not coming clear, or is too dark? and you can't use flash? USE EXPOSURE COMPENSATION!

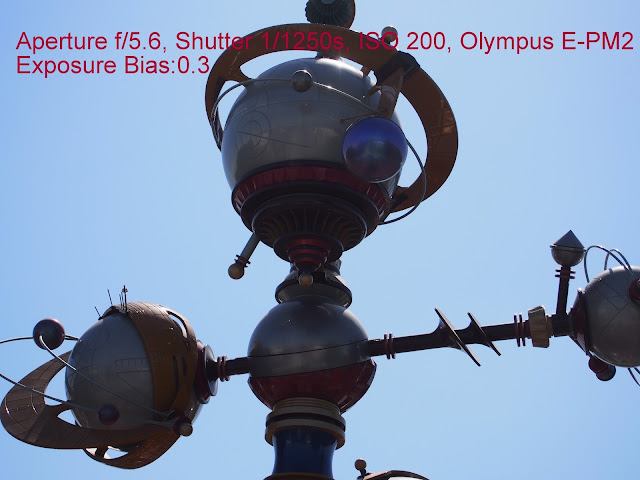
This is a photo of one structure at Disneyland, California. I wanted to take a photo from the line I was in for another ride there. The sun was in front so the first photo came very dark. As this structure was far away, using a flash would be of no use. What should you do to make your photo better?


The issue was with the object being too dark. Solution was to provide more light. Flash would not be useful as flash light does not work beyond 15-20 feet.
Solution: I needed to tell camera to take in more light. Most cameras and even smartphone cameras have EV (Exposure Value) compensation. You can access it with the button or symbol that reads like +/_


I clicked on it and moved it to the right, towards positive value. I sent it between +2 and +3. How did I choose this number? There is no rule. With Trial and Error photography, remember, we use our brain the least when it comes to photography? LOL. If I need too much light in the new photo, I would select +2. If I want only a little more light, I would select +1/2 or +1/3. By choosing +2.7, I wanted the camera to take in more than double the light than what it was thinking was correct light (exposure).


See the magic! As camera too more light, I was able to get the structure and colors better than what I had got in the first photo!

Similarly, if your first photo is too bright and you want to make it darker, press the EV compensation button and set some negative value. The more negative value you choose, the darker the image will be. What will be the correct value? Try 2-3 different values and you will have one photo you like!

Too much light behind your subject? TURN ON FLASH!

This photo was taken inside Luxor (Pyramid) casino, in Las Vegas. There was very strong backlight so camera was fooled. In Auto mode, it gave us following photo. It was a disaster!

As per Trial and Error Photography system, what is the problem here? Camera was fooled by very bright sky (backlight). I needed light on the faces so I turned on Flash. (If your camera does not let you force it to use Flash in Auto mode, please change your camera to P or Program mode. This is an Auto like mode but here Camera would work like your slave instead of acting like your boss ;)

Here is the new photo with the flash. Maybe this is not a great photo. I know. I am not entering this photo in any contest. I wanted to share this photo with my guests and I am pretty happy I have a photo which would stay in their memory and albums for years!


Photo is Blurry because of low light? TRY BOOSTING ISO!

Well, on this blog I promised that I would keep my tips simple. I have to bend that rule a bit, at times. There are situations when easy tips do not work. You have a choice though. You can accept the limitation and give up or learn a bit more and try to make your camera more useful even in more demanding situations.

I was inside one cathedral. It was a bit dull light inside. I tried to take a photo and the photo came very blurry. I noticed that my camera was set to ISO 100 and hence the Camera had to have shutter speed of 4 full seconds! No one has that kind of steady hands! Blur was a definite by product in this situation. Look at the horrible photo I had.


Problem: Blurry photo. Low light. Shutter open too long for a hand held camera

To solve the problem, we have few alternatives.
  1. If the object is within 15-20 feet, turn on Flash. However, in my case, it was more than 30 feet away. Also Flash would not be desirable as it would have created reflections from some bright reflective spots.
  2. If I had a tripod, I would have loved to use it. I rarely carry tripod. (Remember, I don't do photography to get paid! I do photos to please myself, my family, my friends and my contacts on Social Media. Carrying a tripod does not really help me!)
  3. If you don't have a tripod, you can still find a bench or a table to put camera on, or a wall to lean against or hold the camera against some steady thing so there is no shake.
  4. Be familiar with ISO. ISO is camera's sensitivity to light. The higher the ISO, the faster shutter speed you get with everything else being constant. If that is the case, you would ask me, why would we ever work with a lower ISO. Well, the higher the ISO, there are more chances for noise in the photo. Don't ask me what is noise. Please google it LOL. In simple terms, noise is the graininess in the photo. One good thing is most modern cameras are able to produce nice images even with ISO as high as 3200 or 6400! (If you use a smartphone camera or an iPhone camera, your images are likely to be too grainy above ISO 800! However, their screen so so sharp and bright, your high ISO images will still look good. The problem is when you print them or look at them on a computer or a laptop!)
    In my situation here, I had no tripod. Light was low. Only option I had was to bump up ISO. I set it 6400 and took the photo again. Don't you think it worked well?

Here is my new photo with high ISO, at 6400!

Indoor, low light, photos, coming out blurry and you can't use flash? USE A TRIPOD OR HOLD CAMERA NEXT TO SOME STEADY OBJECT!

I was inside Natural History Museum in Los Angeles.  There was beautiful pattern on a wall. I wanted to take a photo of it. In Auto mode, I clicked on the shutter. The photo was blurry.


What is the problem? A blurry photo, low light.

I though of flash but it would not work as it would create reflections. Also, it was bit far and not whole art was at equal distance. As light falls of exponentially (Inverse square root law of light..or something they call it!), the fan end would get darker anyway.

I didn't have tripod either! What was my fix? There was a wall next to me. I held my camera against the wall. I just had to press it against the wall and this would help keep the camera steady. 
It did the trick! My photo was sharp and clear!
Don't think TEP is a great way to fix your photos? If  you do, please share this tip and other tips with your friends on Facebook! If you friends are able to take better photos, your eyes will thank you too when you look at their photos! This way we can together make the world a better place one thing at a time, one photo at a time.


Indoor, or low light, photos are coming out blurry? USE FLASH!

In a relatively dark room, I was trying to take photo of my son who had put artificial mustache, and dark shades. As there was no light, the camera had to keep the shutter open too long. Little bit of technical details- when shooting human beings, the shutter should generally be no slower than 1/70 or 1/50 second! If you are shooting kids or pets, it needs to be even more faster like 1/100 or 1/150 to avoid any blur because of the breathing or movement by the subject. The shutter in this case was open for almost a half second! 25 times slower than 1/50 second that I would have liked!


What is the problem here? The light is too low. Plus, the subject is within the range of camera flash (within 15 feet). I turned on Flash and took a new photo! Problem fixed. The photo came out very well.
My mission reached! I am happy. Maybe this is not a great photo to enter into a contest or get paid but for my needs, and to share on Facebook or WhatsApp, this is a great photo!


Thursday, May 26, 2016

You can't change the world (light I mean); CHANGE YOUR POSITION/DIRECTION! MOVE YOURSELF!!

I was at my son's school taking photos of kids on a bright sunny afternoon! Probably you already know that most professional photographers don't like to take photos outdoor on a sunny afternoon! However, we are not professional photographers ;) We can't tell the school office to schedule the event in early morning or in the evening. We don't have many choices.
There were some mom's, my wife and her friends, who wanted me to take their photos. They were in the shade, under a tree. I took one photo and it came a bit darker. Faces were not clearly visible. I knew my problem. I needed to get faces exposed better without washing out the background completely. I needed better reflected light on the faces.

I didn't want to change settings on the camera so I made a quick decision. After taking first photo, I moved on the other side and asked them to turn around. Them I moved 90 degrees and took a third photo. I wasn't sure which direction offered better reflected light! So I just took photos from 3 different angles! I knew one of them would be better then the other!
So sometimes, when you can't change the light, change yourself ;) Change your position or direction.


Don't you agree Trial and Error Photography helps you take better photos?
To summarize: Take a photo. If it is not good, find the issue. Once you know the issue, try to fix it and retake a photo.

Is someone's face too dark in the photo? TURN ON FLASH!

We love to take our photos against some man made or natural backdrop, like in front of  Eiffel Tower, Statue of Liberty or against some great natural landscape.
Here I wanted to take a photo of my friend during a hike. The background was filled with low clouds, mountains and the town underneath. However, when I took the photo in Auto mode. my friend was too dark as he was under the shadow. Once I can determine the issue, I can work on fixing it. I needed to change camera a bit. Now in such situations, if you try to expose the photo, as per my previous post on adjusting exposure, based on the light on the face of my friend, the camera will overexpose the scene and the background would be washed out (too bright). So what do I do?


I turned the flash on and asked camera to fire the flash. The flash provided light for the 20-25 feet from me. This was enough to brighten the face of my friend and the the shrub that was right behind him. The result was a beautiful photo!

Is your photo too dark or too bright? TELL CAMERA WHAT IS IMPORTANT IN THE PHOTO!

Most modern cameras work great in the Auto mode most of the time. However, there are times when our photos are too dark or too bright. Sometimes, this can be blamed on the camera but most of the time, such issues arise because we are taking photos in a situation where some parts are too bright and some parts are too dark. Too dark does not mean literally too dark. It is relative. On a bright day outside, the sky is normally blue and bright but trees or things in shadows are considered relatively too dark. Any camera can capture the brightest area and the darkest area only if they are reasonably apart in brightness level.

Take an example of the landscape here. The plants, shrub at the bottom of the frame is relatively too dark compared to the sky. So when you take a photo in Auto mode, any camera would get confused. It would not what is important for you. The details in the dark area or in the bright area.

How can you use Trial and Error photography in such situations? Simple. Take a photo. If it is darker, tap (or touch for 1-2 seconds) the screen in the darker areas of your phone or a touch screen camera and it will take photos to take details in that part. To make an Auto mode photo darker, I would tap/touch the brighter area of the frame, and to make a photo brighter, I would tap on the darker part of the frame on the screen.
Note: For some phones, you just need to **tap** the dark/bright area for the camera to meter off of it, and for some other cameras, like my Android Samsung Note 4, you may have to touch for 1-2 seconds.


If you are using a camera, you can use the EV compensation or focus on something that is in the dark/bright part of the frame to make the photo brighter or darker. As most smartphone cameras and compact cameras keep most of the things in focus, this simple trick will work well most of the time. However, if you are worried about focusing too, find the EV compensation button on your camera. Move it to negative to make a photo darker. Move it to positive to make a photo brighter.
This is how the EV button looks like on most cameras.

Press that button. Then click on the left or right scrolling button to change the value to negative or positive. The more you move the value away from zero (center), the photo gets darker or brighter. 


Is your photo blurry? TELL YOUR CAMERA WHERE TO FOCUS!

I want to highlight importance of proper focusing and want to show you how easy it is!
On my walk, I came across a tree full of beautiful yellow flowers. Each flower was very beautiful. I wanted to capture every flower and also wanted to highlight that there was a tree full of such flowers.
As we do in TEP (Trial and Error Photography), I took my photo. I didn't like it. What was the issue?The flowers that I want to show clearly were blurry. The problem was that the camera didn't focus the way I wanted it to do.

How did I solve the problem? I was taking photo with my cell phone so when I was viewing at the screen, I tapped my camera where the nearby flowers were displayed. This told the camera what I wanted it to focus on. Then I took the photo. Voila! The photo came out very well. 


Tip: When using a camera that has touch screen, do the same as you would on a smartphone. Just tap the screen to tell the camera where you want it to focus. If you camera is not touch screen, just press the Shutter Release button (well, this is the button you click to take photos!) half way. This will give camera time to focus. If you don't like where the camera is focusing, release the button and try it again. Most cameras keep focusing on different objects in the scene when you half-press the button again.
Do you think it is that difficult to take better photos? If you like this simple tip, share it with your friends on Facebook or any social media sites.